portré Digital ID photo

Magyarul Valid HTML 4.01 Tr.
In this session you have to create a digital self-portrait, label it with your name and Neptun-code, and upload it hrough the link at the bottom of this page.

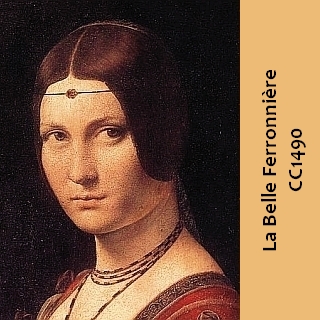
The sample is a picture probably by Leonardo da Vinci (La Belle Ferronière )

1. Portrait

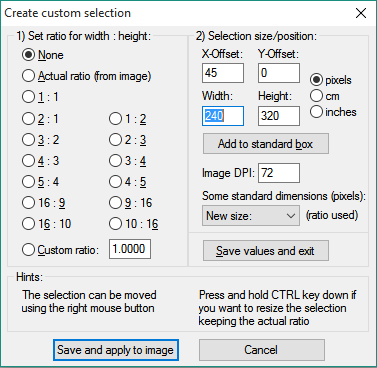
Create your digital self-portrait as a 240x320 pixel, 16 million color picture.

Create or find a picture showing yourself (a self-portrait). Usually this picture would be bigger than required, so its size should be reduced. Obviously, there are plenty of image manipulation apps capable of doing that—this small description demonstrates the necessary steps using Irfanview, a small, freeware image viewer that is also capable of basic level image manipulation.

You can find it on the computers of the lab, but it can be run also for example from your pendrive as portable application (see e.g. portableapps.com).


Height

Ctrl+Y
  • Click and drag the mouse in order to draw a rectangular selection window that contains the part of the image that contains your face.
    You can see the top left position and the size of the selection window in the header of the window.
    You can drag the edges of the selection window to change its size.
    You can reposition (move) the selection window by clicking and holding down the right mouse button.
  • In this first step we focus on the height of the selection only, and ignore its ratio.
  • The Edit ↪ Crop selection command (Ctrl+Y) cuts everything outside of the selection.

Ctrl+R

Resize

Use the Image ↪ Resize/Resample command (Ctrl+R) to set the height of the image.
Make sure that the Preserve aspect ratio checkbox is checked, otherwise the image would become distorted.
In the Set new size area set the Height to 320 pixels.


Shift+C

Width

  • Use the Edit ↪ Create custom crop selection command (Shift+C) to set the size of the image precisely.
    In the Set ratio for width : height area, select the ◉ None (or the ◉ 3 : 4) option
    In the Selection size/position area set the Width to 240 pixels and the Height to 320 pixels.
    Apply the selection to the picture.
  • Move the selection window by clicking and holding down the right mouse button.
  • Use the Edit ↪ Crop selection command (Ctrl+Y) to get rid of the unnecessary part of the image.

2. Caption

Enlarge the picture by 80 pixels on the right side using a background color whose Red+Green+Blue value is less than 300 or greater than 450.

Write your name and Neptun-code in the newly added area in black (on light background) or white (on dark background) using the Bold style of the Candara font with 16 pt size.

Shift+V

Canvas Size

Use the Image ↪ Change canvas size command (Shift+V) to add a border to the right side of the image.
Set the Right side border to 80 pixels (and set all the others to 0).
Click inside the Canvas color area or on the Choose button and set the background color (e.g. RGB 238-187-119).
Check the appearance by clicking on the Apply to the original image button before you finally click on OK.

Ctrl+T

Text

  • Use the Image ↪ Rotate right command (R) to rotate the image.
  • Use the Edit ↪ Create custom crop selection command (Shift+C) to select the area where the text should be placed—and set the X-offset to 0, the Y-offset to 256, the Width to 320, the Height to 60 pixels.
  • Use theEdit ↪ Insert text command (Ctrl+T) to add the text to the image.
    Write your name and Neptun-code (in two rows) into the Text box
    Click on the Font button and select the Candara font, the Bold style, and the 16 pt size.
    Click on the Color button and select black or white depending on the color of your background color.
    Select the ◉ Center option
    Check the appearance by clicking on the Preview button before you finally click on OK
  • Use the Image ↪ Rotate left command (L) to rotate the image back to its original position.

3. Save

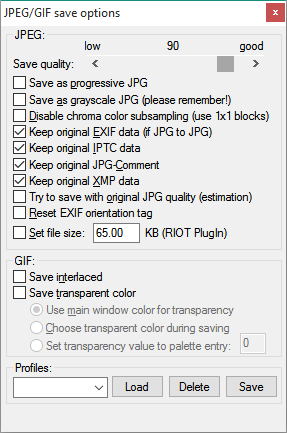
Save your picture as a 90% quality JPG file. The file name should be your Neptun-code.

Ctrl+S

Quality

  • Use the File ↪ Save command (Ctrl+S) to save the file
    Change filename in order to keep the original file also.
  • The quality of the saved JPG file can be changed—which obviously affects the filesize.
    Make sure that the Show options dialog checkbox at the bottom of the dialog box is checked.
    Set the Save quality on the secondary panel to 90%.
  • Digital cameras (including smartphones) save additional data into the image file (date, time, camera model, lenslength etc.), and create a small (thumbnail) preview of the full picture also. If you want to get rid of these, you can simply uncheck the Keep original… (EXIF data, IPTC data, JPG comment, XMP data) checkboxes.

4. Submission

Submit the ID here.